Screen and Audio Capture
For screen and audio captures we recommend to download and install OBS Studio on your system. OBS Studio is a free and open-source cross-platform streaming and recording program maintained by the OBS Project. There are versions of OBS Studio available for Microsoft Windows, macOS and Linux distributions.
Download OBS Studio View OBS Studio documentation
Hardware Setup
The Academy videos are rendered with a 16:9 aspect ratio. Please ensure that the display you are recording from has a 16:9 aspect ratio, which is evident by a native resolutions of 1920x1080, 2560x1440, or 3840x2160.
Be aware that a variety of laptops, such as the Apple MacBook Pro have an aspect ratio of 16:10, which will results in black borders on the sides of the screen capture. In this case, please connect an external display with an aspect ratio of 16:9 to record from.
For audio input capture, please use an external microphone instead of your laptop’s built-in microphone. Laptop microphones are prone to picking up fan noise, which even if filtered generally results in worse audio quality.
OBS Studio Settings
To achieve a good picture quality, we recommend to use the following settings for OBS Studio.
- Open the Settings menu
- Select the Output category
- Change the Output Mode to
Advanced, which will show additional settings -
Open the Recoding tab, which is now visible. Set the following values.
Option Value Recording Path Path to storage directory Recording Format mp4Encoder x264Rate Control CRFCRF 23Keyframe Interval 0CPU Usage Preset very fastProfile high -
Select the Audio category and set the following values.
Option Value Sample Rate 48 kHzChannels Mono -
Select the Video category and set the following values.
Option Value Base Resolution Your display resolution Output Resolution 1920x1080Downscale Filter LanczosCommon FPS Values 30 -
Open the Advanced category and set the following values.
Option Value Color Format NV12Output Resolution 1920x1080Color Space 709Color Range Full
Sources
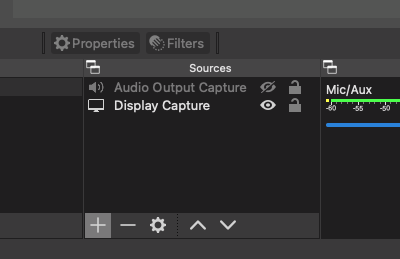
Screen capture and audio capture is done from a source, which is specified in Sources on the bottom of the main screen of OBS Studio.
To add a screen capture follow these steps.
- Select + and Display Capture
- A window will open in which the display to capture from can be selected from a drop-down menu
Selected sources will appear in the Sources list and can be toggled on or off with the eye icon.

For audio, we distinguish between audio input capture, e.g. from a microphone, and audio output capture, e.g. from audio playback on the computer you are recording from.
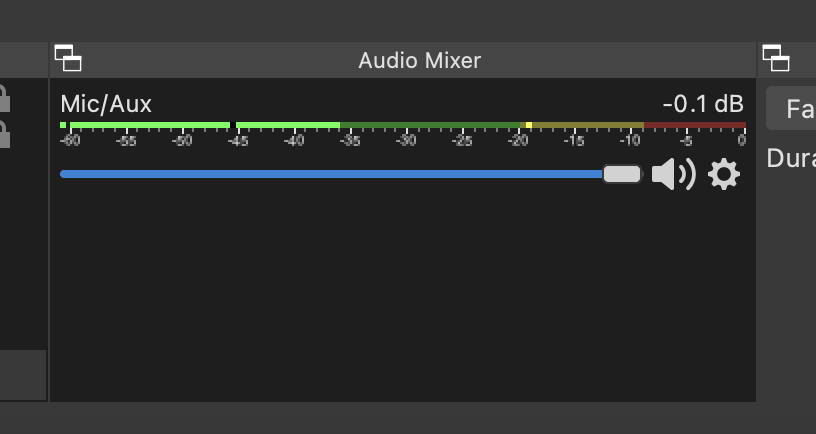
By default, and audio input capture should be set up in the Audio Mixer window called Mic/Aux.

To add additional audio input captures follow these steps.
- Select + and Audio Input Capture
- A window will open in which the microphone to capture from can be selected from a drop-down menu
We suggest to not use audio output captures, e.g. to not play back a video on the recorded display, but instead submit the video to us to add it separately to an Academy course. In addition, audio output capture is not natively supported on some operating systems, such as macOS. If you still wish to add an audio output capture follow these steps.
- Select + and Audio Output Capture
- A window will open in which the audio output to capture from can be selected from a drop-down menu
Capture Webcam
If you wish to capture an image of yourself from your webcam and add it to the recording follow these steps.
- Select + and Video Capture Device
- A window will open in which the webcam to capture from can be selected from a drop-down menu
- Use the Move Up and Move Down arrow icons in the Sources window to bring the webcam capture to the foreground
- Resize and position the webcam capture at your desired location on top of the display capture
Tips
- An external display will allow you to have OBS Studio opened on one screen, while recording from the other one.
- We recommend to record several shorter videos, instead of one long video for the entire course.
- It may be necessary to grant OBS Studio access to the audio input devices and screen image. Particularly, macOS devices may not automatically grant permissions to OBS Studio during install. In that case you can do the following.
- Open the macOS System Preferences.
- Select Security & Privacy.
- Open the Privacy tab.
- Allow the
OBS.appfor the Microphone, Screen Recording and Camera (optional if you plan to record with a camera).
