Chapter 8 Code Documentation
Apps
Materialized Queries Manager
Models
This app has only one model, MaterializedQuery, which maps to a Postgres materialized view. To avoid having to maintain the consistency between both the records of this Django app and the Postgres materialized views:
- the managed Meta flag was set to
Falseto avoid Django creating migrations to the model - the db_table Meta flag was set to the name of the table where Postgres stores the information about the existing materialized views (
pg_matviews). - the fields of the model, matviewname and definition, use the same name and type as the ones of the
pg_matviewsPostgres table.
Views
This app has no view exposed since all operations to the MaterializedQuery models are expected to be performed in the Django admin app.
However, we had to change Django’s default behaviors for the create, update and delete operations of the model.
For the delete operation, we overrode the delete method of the MaterializedQuery Django model to just execute a DROP MATERIALIZED VIEW SQL statement.
Related to creation and update we had to change some internal methods of Django’s admin app ModelAdmin base class.
- _changeform_view: where Model records were being created.
Instead,
CREATE MATERIALIZED VIEWandALTER MATERIALIZED VIEWSQL statements are executed. However, since some materialized views might take some time to build, create a record like this could lead to a browser timeout. We then decided to execute these statements in a celery background task. The main changes were made here where we launch the background task. - response_add: Since the materialized view might not be created the right way, saying “A record was created successfully” is not adequate. We then changed the message that is presented after the creation to tell in the id of the background task that is creating the materialized query. The result of the query can then be consulted on the associated Task Results record on the Celery Results section app of the Django admin console.
- response_change: changes here with the same ideas behind as response_add.
If any catalogue results files are being uploaded to the platform, any worker attempting to create or change a materialized view will block until such data is uploaded. Also if any worker is creating materialized views, no other worker can upload catalogue results data.
Through the admin console, there is also the possibility to refresh a specific MaterializedQuery. To do so, on the list view, select the MaterializedQueries to refresh, then on the actions dropdown select “Refresh selected materialized queries”. Once again to avoid timeouts, such operations are executed on a background task.
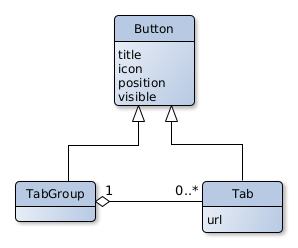
Tabs Manager
Currently, this app is not being used and the URL mapping was delete.
To use it again uncomment the tabsManager line on the dashboard_viewer/dashboard_viewer/urls.py file.
Then you can access the tabs page through the [BASE_URL]/tabs/ URL.
Views
On this app, there is only one view. It is a simple page with just a sidebar to choose which dashboard to displays on an iframe. Besides the simplicity, all the animations around the sidebar buttons are handled by CSS with some JS that adds and removes classes to HTML elements, as events (hover and click) happen. To facilitate the development process of CSS, SCSS was used to build styling of the view. It prevents duplication with the addition of variables and adds the possibility to express parent classes by nesting their declaration.
In cases where there are a lot of buttons on the sidebar, some buttons might get impossible to reach since they are out of the field of view. To avoid this we make use of SimpleBar, which makes the sidebar scrollable, displaying a scroll bar on the right side of the sidebar whenever there are elements outside of the field of view.
API
There is one endpoint, [BASE_URL]/api/, where a JSON object of tabs and groups of tabs and their sub-tabs are returned.
Models
Uploader
Views
This app exposes three views: 1. Creation of a data source 2. Edition of a data source 3. To Upload or consult the history of uploads of catalogue results files.
The first one can be accessed through the [BASE_URL]/uploader/[DATA_SOURCE_HASH]/ URL.
- If no hash is provided on the URL then on the creation of the data source a random one will be assigned.
- If there is already a data source with the provided hash then the user is redirected to the upload page of that data source.
This view also allows creating data sources without displaying the webform, redirecting directly to the uploader page.
This can be achieved by providing the data of several fields of the form as URL arguments.
E.g. [BASE_URL]/uploader/[DATA_SOURCE_HASH]/?acronym=test....
This is implemented in a way so that whenever a GET is performed, it checks the URL arguments and tries to submit the data source form.
If it is valid, all the required fields were provided and are valid, then the user is redirected to the upload page.
Else all the valid values are set in the form, the invalid ones are being discarded, and the data source creation page is presented with no error messages.
The country field should contain a value from the ones available on the dropdown presented in the webform and since the coordinates is a two-component value it should be provided as coordinates_0=[LATITUDE]&coordinates_1=[LONGITUDE].
It is important to note that this view does not require a CSRF token, so a normal POST form submission can be performed to create a data source.
The second one can be accessed through the [BASE_URL]/uploader/[DATA_SOURCE_HASH]/edit/ URL or by clicking on the Edit button on the data source upload page.
Finally, on the upload page, a data owner can consult the history of uploads, their state, and eventually error messages if some went wrong. Whenever an upload is made its state will be pending. After the upload, with a 5-second interval, a request is made to the backend to check if the status of the upload changed. If it fails, an error message will be provided in a tooltip above a button with a message icon. Else the state will change to Done and the information about the upload retrieved from the uploaded file, present on the check status request, is filled.
Related to file uploading, after the file form is submitted no validation is made and a message is presented to the user telling that the file is being processed in the background, then the fetch status process mentioned before starts. If validations were performed before returning a message to the user, if the validation took too much time, the browser could timeout. Also if some unexpected error happened on the insertion process performed in the background, the user would get any feedback.
Related to the background task that validates and uploads the data, the validation can fail if:
| Error | Message |
|---|---|
| Invalid Number of Columns | The provided file has an invalid number of columns |
| Invalid CSV File Format | The provided file has an invalid CSV format. Make sure is a text file separated by commas and you either have 7 (regular results file) or 13 (results file with dist columns) columns. |
| Missing Required Fields | Some rows have null values either on the column “analysis_id” or “count_value” |
| Invalid Field Types | The provided file has invalid values on some columns. Remember that only the "stratum_*" columns accept strings, all the other fields expect numeric types. |
| Duplicated Metadata Rows | Analysis id[output] duplicated on multiple rows. Try (re)running the plugin CatalogueExport on your database. |
| Missing Required Metadata Row | Analysis id 0 is missing. Try (re)running the plugin CatalogueExport on your database. |
Any other error is considered an unexpected error and the following message will be presented “An unexpected error occurred while processing your file. Please contact the system administrator for more details.”.
If the file passes all validations, it goes to the upload data phase. Here, if workers are creating or refreshing materialized queries then the worker blocks. If there are other workers inserting data for the same data source it will also block. However, several workers of different data sources can insert data at the same time. All the workers, after inserting the data, check if they are the only worker inserting data. If so they refresh the existing materialized queries. Else the next worker to finish inserting data will do the same check.
Widgets
For the data source form two custom widgets were created for the following fields:
- Database Type: To avoid having duplicate entries with the same meaning (e.g. Hospital, hospital), the input of this field has a autocomplete list where existing values are suggested to the user. Also before saving the field to the database spaces are trimmed and the values are transformed into title case here.
- Coordinates: 1. This is a two-component field; 2. Inserting coordinates by hand is tedious. Considering the previous points, we created a widget with a map built with leaflet where the user just needs to click on the map.
API
This app provided two API endpoints
Update data source information: a PATCH request with a JSON object on the body of the request with the fields and their new values.
Pending upload status: a GET request that returns JSON data where there is always a
statusfield that can have three statuses which then can lead to additional data be also present:
- Pending: the upload in question hasn’t finished
- Done: the upload finished and there was nothing wrong with the uploaded file.
Along with the status, there will be a
datafield with a JSON object with the fieldsr_package_version,generation_date,cdm_version, andvocabulary_versionwhich are data source information that was extracted from the uploaded file. - Failed: the upload finished but there was something wrong with the uploaded file.
Along with the status, there will be a
failure_msgfield telling the reason for the failure.
Models
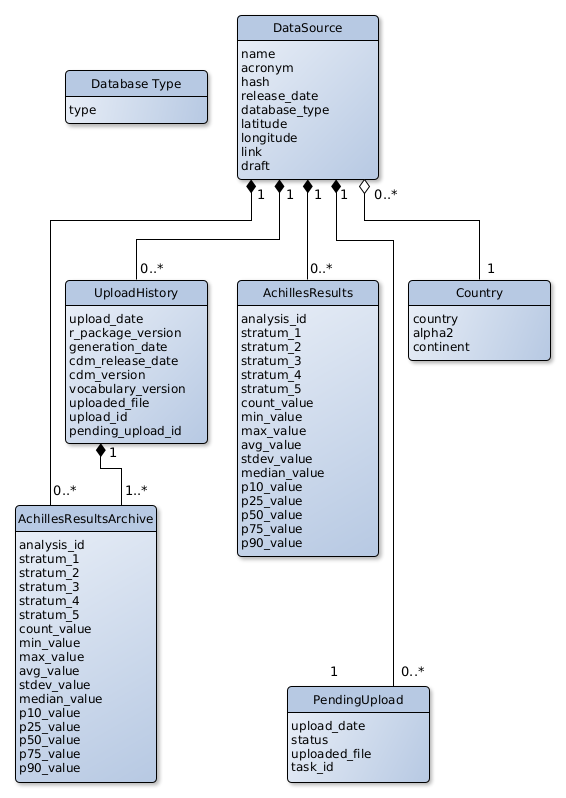
- Country data is loaded in a fresh installation through the docker-init.sh script if no records are present on the Country table.
- The DataSource model doesn’t have a foreign key to the DatabaseType model to then facilitate the creation of SQL queries to feet Superset’s dashboards. The DatabaseType is used anyway to have a faster way to check if a certain database type already exists on the database, avoiding going through every DataSource record.
- The same situation of the DatabaseType model also happens between the UploadHistory and PendingUpload models.
There is no foreign key between a UploadHistory and a PendingUpload.
This is because PendingUpload records are deleted once an upload is successful.
When the upload view requests the status of a certain upload, it uses the id of the pending upload.
If no pending upload is found, it is assumed that the upload was successful and searches for uploads on the UploadHistory model with the pending_upload_id field equal to the certain upload id.
Related to where the uploaded files are stored, within the media directory there will be a ACHILLES_RESULTS_STORAGE_PATH directory which will have a directory for each data source.
Within this last directory, first, files are uploaded to a
failuredirectory. If the upload is successful the file is moved to a success directory. In both cases, the file name will be the date of when the file is being saved into disk plus its original extensions.
JavaScript Packages
While developing the templates for Django views, if a certain javascript library is required, like jquery, one option is to insert script tags on the templates and point the src to a CDN.
However, this makes the process of maintaining the libraries tedious since a developer has to search and change all the script tags if for example wants to update the library’s version.
To avoid this problem we have a package.json file where we define all the libraries that we use and their version.
Then we add the node_modules directory as a static file directory.
With this alternative, updating a library is as simple as changing a number of the package.json file, run npm install and collect the static files again.